Hello everyone! I wanted to apologize for my week long absence. I was only supposed to be gone for a couple of days, in order to spend the three day weekend with the boyfriend, whose been working a lot as of late. After the weekend was over, I got a bit sick; maybe a stomach bug, I'm not exactly sure. It was a quick, non-consequential illness, so I got over it quickly. During that time, I found out that my grandfather had passed away. Though he hasn't been doing well for a while, it was still very sad for our family. So instead of blogging, I took the time to write something out for my grandpa to be read to my grandmother. I just wanted her and my family to know just how much he meant to me, and to highlight so many great memories we've shared together. In the end, heaven is so lucky to have him. He was a great man, and I'm glad he is no longer suffering. I will miss him so much, but I know he's in a better place.
Thank you all for your patience! I'm going to be getting back to blogging shortly, and will be finally preparing some more posts, as well as finishing posts that should have already gone out. I wanted to say that I appreciate all of you so much who take the time to read my little corner of the internet. I hope you are all having a good day, and thanks again for your understanding!
-Justine <3
Friday, February 22, 2013

Saturday, February 16, 2013
February 2013 Ipsy Bag
Yay! The February Ipsy Bag is here. I just want to start off by saying that I just adore receiving a bag every month in the mail. I love anticipating what items are arriving, as well as actually getting/testing out the products. It's definitely a joy! Ipsy is a $10 monthly subscription service. For a comprehensive overview of what Ipsy is, visit Ipsy's website or one of my previous posts (January Ipsy Bag or December Ipsy Bag).
 |
| The February Ipsy Bag-Don't you just love the pink envelope it comes in? I thought it was worthy of being in the pics this time! |
 |
| Front of card. |
 |
| Back of card. |
There's the included card, as usual. The theme appears to be "Get Red Carpet Ready" with a huge emphasis on eye products. I was honestly surprised that Ipsy didn't choose a lip product, since that seems to be a huge part of a "Red Carpet" look, but I suppose I already have products that fit the bill (like the Be a Bombshell Hot Mess Lip Gloss from December's bag). The nice part is between primer (which I'm sure you could use on your eyes in a pinch), eyeliner, mascara, eye shadow, and lash cards, you basically have a entire eye look!
 |
| Front of bag. |
 |
| Side of bag. It's quite thin! |
 |
| Inside of bag. |
I really like the bag this month! I'm really loving how every bag I've received is a way different shape! This month's bag is made out of shiny black plastic material on the outside, and lined in red (with the Ipsy logo) on the inside. The shape is square, and quite flat. It's a smaller bag, but this went well with the theme of the bag and the small size of the bag's contents.
 |
| Pop Beauty Smoky Lash Kapow! Mascara in Smoky Black |
 |
| This is what the full size and the brush looks like. I don't like to open my mascaras until I get a round to using them. Image from Pop Beauty. |
- Pop Beauty Smoky Lash Kapow Mascara in Smoky Black- Deluxe Sample
- Size: 0.17oz or 4.8g
- Full Size: 0.25 oz or 7g, $18.50
- Value of Sample: $12.69 (After calculating from full-size product. The sample might be available in a gift set, but it's not sold individually).
- The mascara claims to be volumizing and smudge proof. I believe it is waterproof, but Ipsy doesn't say so. I've got a ton of mascaras I have yet to go through (mostly samples and freebies) so I won't get to this one yet, but I will review once I have. This mascara has good review online, so I have high hopes for this product!
- Repurchase? Probably not. I've never been particularly interested in Pop beauty products, especially at the price point. And to be honest, I only use high-end mascara when I get them in gift sets or receive free samples. I'm just too much in love with Covergirl Lash Blast Volume (although Benefit They're Real and Tarte Lights Camera Lashes are also quite good).
- Pleased w/ Ipsy? Yes. I'm always down for mascara! Everyone received this product in the bag.
 |
| Mica Beauty Gel Eyeliner in Black |
 |
| Mica Beauty Gel Eyeliner in Black, open. |
 |
| Though I'd show a comparison. Mica Beauty is on the top, Tarte emphasEYES Amazonian Clay Waterproof Gel Liner is on the bottom. |
 |
| Mica Beauty on left, Tarte on right. Since Tarte's is 2.5g, this is why I came to the conclusion that the Mica Beauty one is about half the size. |
 |
| What the gel eyeliners look like on the website. |
 |
| My swatch! It's so pigmented that I had a lot extra on my brush....so I made an angry face with a tongue. I don't have a reason why. lol. |
- Mica Beauty Gel Eyeliner in Black- Deluxe Sample
- Size: 0.04oz or 1.25g (approximately)
- Full Size: 0.18oz or 5g, $30 (the sale price shown on the website is $30, but it normally retails for $35. I'm going to use the sale price for the purpose of the price calculation of the sample size, since the sample size does not have a brush).
- Value of Sample: Well calculating this sample proved to be a challenge since there is no label on the gel eyeliner pot, so I can't entirely confirm that it isn't 5g. However, there are many notable difference in packaging between the full size shown on the website (see picture above) and the sample I received. First of all, my sample does not feature the included brush on the cap and the pot does not look nearly as full. So I compared it to my Tarte gel eyeliner (0.08oz or 2.5g), which has very similar packaging. When the two are compared side ways, the Tarte gel eyeliner appears to have about twice the amount of product as the Mica Beauty one. So in conclusion, I deem this product to be approximately 0.04oz or 1.25g, and worth $7.50.
- I like the idea of receiving gel eyeliner in the box, especially one that is smooth, pigmented, long-wearing, and smudge-proof. So far, this claims have be all of those things! It applied beautifully, and was lasting all day with absolutely no migrating anywhere! When I took the swatch off my hand, it came off in flakes like a liquid liner. This did not effect the wear on my eyes, and made it easier to remove!
- Repurchase? Probably not. Even though I do enjoy this product, the price point is rather high. Especially considering I already own some Tarte gel eyeliners, and have enjoyed cheaper ones from the drugstores. I checked out their website, and their prices are crazy. $64.95 for a 9g powder foundation and $29.95 for mascara? Heck no!
- Pleased w/ Ipsy? Yes. The quality of the liner is lovely, though I am disappointed that it was not full size like I had assumed. Everyone received this in the bag in the same shade of black.
 |
| Lash Card Packaging, front. |
 |
| Lash Card packaging, back. |
 |
| What an individual lash card looks like. I love how the words are written, so you can see them in the mirror! |
 |
| There's 4 in the sample. Making a fan shape with your hand, optional. |
- Lash Card Individually Wrapped Mascara Shields (4 cards)- Deluxe Sample
- Size: 4 cards
- Full Size: 10 cards, $6.99
- Value of Sample: $2.80 (After calculating from full-size product).
- Mascara shields? Can we say "womp, womp." This is definitely the dud of the box, but it might be still kind of fun to try. These claim to be used for separating lashes, bottom lashes, layering mascara, reapplying mascara, or maximizing curl. I don't know about all that, but basically you put the lash card behind your lashes so you don't get mascara all over your eyeshadow or under eye area. I think you could just use a business card, but the shape of the cards is supposed to work better. I might also try to do a winged eyeliner with it. These are supposed to be a one time use card, but I might reuse them anyway if they aren't too dirty...lol.
- Repurchase? No. "Ain't nobody got time for that!" (Please tell me you know what youtube video I'm talking about. If not go type that in right now!)
- Pleased w/ Ipsy? No. But with everything else in the box, I'm not going to we a whiner. Everyone received this product in the bag.
 |
| Pixi Flawless and Poreless Primer, front. |
 |
| Pixi Flawless and Poreless Primer, back. |
 |
| Pixi Flawless and Poreless Primer, inside. |
- Pixi Flawless and Poreless Primer- Deluxe Sample
- Size: 15ml or 0.5oz
- Full Size: 50ml or 1oz, $29
- Value of Sample: $14.50 (After calculating from full-size product).
- The primer claims to be oil-free, hypoallergenic, shine-controlling, pore-minimizing, hydrating, suitable for all skin types/complexions, helpful for extending the wear of foundation. It contains willow bark (for shine control), salicylic acid (to clear and unblock pores), shea butter (to nourish skin), titanium dioxide (to protect skin), and enantia chlorantha bark (medicinal and anti-viral). That's quite the list of claims. The product itself comes out of the tube skin-colored, but blends out to be translucent. I'm particularly excited to try this since it looks like it may be beneficial for acne-prone skin. I'm wondering if the primer meets all the claims!
- Repurchase? Maybe, if I enjoy the product. It's about the same price as most high end primers (or a bit cheaper). Also, Pixi is readily available at Target. Another interesting thing is that I think the same owner owns both Pixi and Pop Beauty (I've seen them on Hautelook, and there are featured together on the same sale!)
- Pleased w/ Ipsy? Yes. Primer is great to receive in a bag, and I'm stockpiling samples so I don't have to pay for full sizes! I'm a sneaky pack rat like that. Everyone received this product in the bag.
 |
| Coastal Scents In the Spotlight (counterclockwise from top): Dark Goldenrod, Sunbeam, Golden Globe, Dark Olive. |
 |
| Coastal Scents In the Spotlight, back. |
 |
| Coastal Scents In the Spotlight Swatches (counterclockwise from top): Dark Goldenrod, Sunbeam, Golden Globe, Dark Olive. |
 |
| I tried to get a different view so you could see the green duo chrome in Dark Goldenrod. I failed! |
 |
| The eyeshadow quad compared to a full size Coastal Scents Eyeshadow Palette (the 88 original). |
- Coastal Scents In the Spotlight Eye Shadow Sample Set (Dark Goldenrod, Sunbeam, Golden Globe, Dark Golden Olive)-Deluxe Sample
- Size: 2g/0.07oz total, or 0.5g/0.0175g per pot
- Full Size: 1.3g or 0.04oz, $1.99 (The full size is for a single eyeshadow color in Coastal Scents' Hot Pot individual pan format. The same colors featured in this sample quad are available as a Hot Pot.
- Value of Sample: $3.06 (After calculating from the price of a single full size Hot Pot).
- I've got quite a lot of experience in regards to Coastal Scents eye shadows since I own four 88 palettes (88 Color, 88 Ultra Shimmer, 88 Warm, and 88 Metal Mania). I received all four in a giveaway hosted by the beautiful Sarah of Beauty Vigilante. These aren't the highest quality eyeshadows I've ever used (compared to Urban Decay or Inglot), but they are quite wonderfully pigmented, especially for the price. They tend to be powdery with some fall-out, but it's manageable. I absolutely love the golden/green colors of this palette, so I'm very pleased! Now for a breakdown of the colors:
- Dark Goldenrod: A deep, gleaming golden hue with a satin finish. The coverage is semi-opaque.
- My Take: I would call this completely opaque, personally. The texture of this was smooth, pigmented, and only a little powdery. This color is certainly golden, but it has a bit of a duo chrome green iridescence going on. It's a really unique color to my collection, and for $1.99, I might have to actually pick up this shade. A total win!
- Sunbeam: A pastel yellow with a matte finish. The coverage is sheer.
- My Take: It's definitely sheer and VERY powdery. Not the best matte in the world. It looks almost neon yellow, while still being a pastel. I'm not sure how I'd use this color with the others in the quad, to be honest.
- Golden Globe: A glistening golden hue with a satin finish. The coverage is semi-opaque.
- My Take: Another great shade. Not as pigmented as Dark Goldenrod, but still not bad. Fairly powdery. It's definitely a yellow-toned gold.
- Dark Golden Olive: A shimmering deep green with gold iridescent sparkles and a metallic finish. The coverage is opaque.
- This one is deep, dark, and super opaque. It's an olive green with gold shimmer, and it's gorgeous. I can't wait to use this in the crease with Dark Goldenrod on the lid! Downside? Major powdery. I would use a small amount due to the major pigmentation and tap off the brush before putting on the lid.
- Repurchase? Yes, if my palettes ever run out (lol) or if I really enjoy these shades and want to get the Hot Pots (must get amazing Dark Goldenrod!). I might want some hot pots anyway when I eventually depot my single shadow and finally invest in a Z palette. I also love that this quad can pretty easily be depotted out of their cheap, plastic packaging and eventually be added to a Z palette (or any magnetic palette).
- Pleased w/ Ipsy? Yes, even though I have a bunch already. Also, similar Coastal Scents quads were received in last October's bag, so some people were probably not pleased since that wasn't too long ago. I've noticed a pattern of Ipsy repeating similar items from the same brand, so hopefully they break out of that soon. Subscribers either received the In the Spotlight quad (like I did) or a quad featuring smokey shades.
Price Breakdown:
- Pop Beauty Smoky Lash Kapow Mascara in Smoky Black-Deluxe Sample-$12.69
- Mica Beauty Gel Eyeliner in Black-Deluxe Sample-$7.50
- Lash Card Individually Wrapped Mascara Shields (4 cards)-Deluxe Sample-$2.80
- Pixi Flawless and Poreless Primer-Deluxe Sample-$14.50
- Coastal Scents In the Spotlight Eye Shadow Sample Set (Dark Goldenrod, Sunbeam, Golden Globe, Dark Golden Olive)-Deluxe Sample-$3.06
Total Value: $40.55
Previous Months' Box: $38.79 (January), $72.67 (December)
Note: I realize I don't add the cost of the bag to the total (since I don't know the value of the bag itself), so I just consider the bag to be a freebie.
Previous Months' Box: $38.79 (January), $72.67 (December)
Note: I realize I don't add the cost of the bag to the total (since I don't know the value of the bag itself), so I just consider the bag to be a freebie.
Overview: The value of the bag quadrupled the $10 I paid, so well done for that. It barely beat January's box, but December's box still had the best value and products. While I am pleased with these products, I find the selection and size of the products slightly lackluster. First of all, there wasn't a single true full-sized item in the entire bag. While these are large samples (some nearly full size), I've gotten spoiled by past bags and have come to expect at least a couple full sized products. I was happy to receive the mascara and gel liner, but it would have been nice to receive a colored gel liner (instead of always black). Primer is always welcome, but I've accumulated a lot of primer samples, and I still have the primer from December's bag. The Coastal Scents quad was nice, but I have four 88 Palettes already from a giveaway, so it wasn't exactly needed. Last and least (lol), the lash cards were kinda the dud, but with everything else I received, I can't complain much. I would consider this a good Ipsy bag but not a great one like December's (I sounds like such a brat! lol). I'm still pleased with Ipsy and will remain a subscriber. And as always, I look forward to next month!
Preview for next month: None yet, since I wrote this review shortly after receiving my bag. I'd love to receive a patterned bag, a blush, a liquid/pen eyeliner, a lipstick, and some full-size goodies! What would you like to receive next month?
Preview for next month: None yet, since I wrote this review shortly after receiving my bag. I'd love to receive a patterned bag, a blush, a liquid/pen eyeliner, a lipstick, and some full-size goodies! What would you like to receive next month?
Disclosure: Most of these products were purchased by me for review purposes. The Coastal Scents 88 Palettes were received from a giveaway hosted by another blogger. I was not paid or compensated in any way. All opinions are my own.
Wednesday, February 13, 2013
Valentine's Day Look-Smokey & Sexy
 |
| Bronzy-brown eyes featuring The Balm Nude 'Tude Palette |
 |
| Cool pink nude lips featuring Maybelline Color Whisper in Lust for Blush |
Hey everyone! This look is a bit more sultry of a Valentine's Day or going-out look, focusing on smokey bronze-brown eyes. I love to use neutral browns instead of traditional "smokey-eye" colors because I find that shades with a golden tone make you look more awake!
1) First I did my Complete Foundation Routine. Click the link for details!

18) Lastly, I applied Maybelline Color Whisper in Lust for Blush to my lips. It's a matte, creamy, sheer, cool-toned pink nude. It's a lovely color to go with smokey eyes!
Here's my load of products (minus foundation products):
 |
| Products used for the look. |
 |
| Brushes used for the look. |
 |
| Products used for face color: (from left to right) ELF Studio Blush Brush, I on Beauty Blusher Brush, The Balm Down Boy Blush, Tarte Amazonian Clay Bronzer in Park Ave Princess, Too Faced Chocolate Soleil Matte Bronzing Powder, MAC This & That Mineralize Eye Shadow, I on Beauty Powder Brush. |
 |
| Products used for face color: (from left to right) The Balm Down Boy Blush, Tarte Amazonian Clay Bronzer in Park Ave Princess, Too Faced Chocolate Soleil Matte Bronzing Powder, MAC This & That Mineralize Eye Shadow. |
 |
| Swatches (from top to bottom): The Balm Down Boy Blush, Tarte Amazonian Clay Bronzer in Park Ave Princess, Too Faced Chocolate Soleil Matte Bronzing Powder. |
 |
| Swatches of MAC This & That Mineralize Eye Shadow (from left to right): Shimmery beige shade, satin white shade, both shades mixed together. |
2) Now it's time to give some color to the face! First I apply The Balm Down Boy Blush to the apples of the cheeks, blending up toward the cheek bones. I used the ELF Studio Blush Brush.
3) Next, I used the I on Beauty Powder Brush to contour the hollows of my cheek bones with the Too Faced Chocolate Soleil Bronzing Powder. This matte bronzer smells like yummy chocolate, making it a pleasure to apply! I used the same brush to apply the Tarte Amazonian Clay Bronzing Powder in Park Ave Princess to my upper forehead, around my hairline, to the sides of my nose, and to my neck.
4) I used the I on Beauty Blusher Brush to apply MAC This & That Mineralize Eye Shadow to my upper cheekbones and the bridge of my nose. I used this eyeshadow duo as a highlighter by mixing both shades together. It's actually a very subtle highlighter, but the white shade in it brings a lot of brightness to the face. I actually got this product from a CCO (Cosmetic Company Outlet) in Vegas, so I got a huge discount on it! I have seen it in actual MAC stores before, but I'm still not sure if it's a permanent product.
3) Next, I used the I on Beauty Powder Brush to contour the hollows of my cheek bones with the Too Faced Chocolate Soleil Bronzing Powder. This matte bronzer smells like yummy chocolate, making it a pleasure to apply! I used the same brush to apply the Tarte Amazonian Clay Bronzing Powder in Park Ave Princess to my upper forehead, around my hairline, to the sides of my nose, and to my neck.
4) I used the I on Beauty Blusher Brush to apply MAC This & That Mineralize Eye Shadow to my upper cheekbones and the bridge of my nose. I used this eyeshadow duo as a highlighter by mixing both shades together. It's actually a very subtle highlighter, but the white shade in it brings a lot of brightness to the face. I actually got this product from a CCO (Cosmetic Company Outlet) in Vegas, so I got a huge discount on it! I have seen it in actual MAC stores before, but I'm still not sure if it's a permanent product.
 |
| Products used for the eyes: (from left to right): I on Beauty Eye Definer Brush, Clinique Blending Brush, ELF Studio Contour Brush, Ecotools Flat Shader Brush, ELF Wet Gloss Lash & Brow Clear Mascara, Spoolie Brush, Benefit They're Real Mascara mini, Urban Decay Eyeshadow Primer Potion mini, The Balm Nude 'tude Eyeshadow Palette, Tarte emphasEYES Amazonian Clay Waterproof Eyeliner in Bronze, Tarte Double-Sided Eyeliner/Smudger Brush, Physician's Formula Shimmer Strips Custom Eyes Enhancing Eyeliner Trio in Warm Nude Eyes in the shade Bronze, Stila #7 Brush. |
 |
| The Balm Nude 'tude Eyeshadow Palette. How cute is the packaging? I used the shades Sassy, Snobby, Sultry, Sophisticated, Seductive, and Sleek. |
 |
| Swatches (by column): Seductive, Sultry, Sophisticated, Physician's Formula Shimmer Strips Custom Eyes Enhancing Eyeliner Trio in Warm Nude Eyes in the shade Bronze, Sassy, Snobby, Sleek, Tarte emphasEYES Amazonian Clay Waterproof Eyeliner in Bronze. |
 |
| Eyes open and closed :) |
 |
| Close-up! |
5) Now for my favorite part, the eyes! First I applied the Urban Decay Eyeshadow Primer Potion all over my lid and all the way up to the brow bone using my fingers.
6) For the most prominent eyeshadow color, I applied Seductive all over the lid and into the crease using I on Beauty Eye Definer Brush.
7) Next I applied the matte Sultry into the crease and fading outward using the ELF Studio Contour Brush. This creates warmth and dimension.
8) Then I darkened the crease (making a V shape in the outer corner) using Sophisticated and the same ELF Studio Contour Brush.
9) Then I further darkened the outer corners of the eyes with the dark matte brown Sleek and using the Stila #7 Brush.
10) I blending out all the colors in the crease using the Clinique Blending Brush.
11) Next I applied a matte skin tone colored eyeshadow, Wet N Wild Color Icon Eye Shadow Single in Creme Brule (not pictured) to the brow bone with the Ecotools Flat Shader Brush, as well as defining the shape of the eyeshadow in the outer corners.
12) Using the Ecotools Flat Shader Brush, I applied Sassy as a brow bone highlight.
13) Using the Ecotools Flat Shader Brush, I applied Snobby to the inner corners of the eyes.
14) For lining the upper lash line, I used the Tarte emphasEYES Amazonian Clay Waterproof Eyeliner in Bronze. This gel liner was applied using the thin eyeliner brush from the Tarte Double-Sided Eyeliner/Smudger Brush.
15) For the lower lash line I used a brighter bronze eyeliner, the Physician's Formula Shimmer Strips Custom Eyes Enhancing Eyeliner Trio in Warm Nude Eyes in the shade Bronze.
16) I coated both the upper and lower lashes with Benefit They're Real Mascara.
17) I filled in my eyebrows with NYX Dark Brown Eyeshadow (not pictured) using the I on Beauty Angled Eyeliner Brush (not pictured). Then I combed out my eyebrows with a Spoolie Brush and set them in place using the ELF Wet Gloss Lash & Brow Clear Mascara.
6) For the most prominent eyeshadow color, I applied Seductive all over the lid and into the crease using I on Beauty Eye Definer Brush.
7) Next I applied the matte Sultry into the crease and fading outward using the ELF Studio Contour Brush. This creates warmth and dimension.
8) Then I darkened the crease (making a V shape in the outer corner) using Sophisticated and the same ELF Studio Contour Brush.
9) Then I further darkened the outer corners of the eyes with the dark matte brown Sleek and using the Stila #7 Brush.
10) I blending out all the colors in the crease using the Clinique Blending Brush.
11) Next I applied a matte skin tone colored eyeshadow, Wet N Wild Color Icon Eye Shadow Single in Creme Brule (not pictured) to the brow bone with the Ecotools Flat Shader Brush, as well as defining the shape of the eyeshadow in the outer corners.
12) Using the Ecotools Flat Shader Brush, I applied Sassy as a brow bone highlight.
13) Using the Ecotools Flat Shader Brush, I applied Snobby to the inner corners of the eyes.
14) For lining the upper lash line, I used the Tarte emphasEYES Amazonian Clay Waterproof Eyeliner in Bronze. This gel liner was applied using the thin eyeliner brush from the Tarte Double-Sided Eyeliner/Smudger Brush.
15) For the lower lash line I used a brighter bronze eyeliner, the Physician's Formula Shimmer Strips Custom Eyes Enhancing Eyeliner Trio in Warm Nude Eyes in the shade Bronze.
16) I coated both the upper and lower lashes with Benefit They're Real Mascara.
17) I filled in my eyebrows with NYX Dark Brown Eyeshadow (not pictured) using the I on Beauty Angled Eyeliner Brush (not pictured). Then I combed out my eyebrows with a Spoolie Brush and set them in place using the ELF Wet Gloss Lash & Brow Clear Mascara.
 |
| Maybelline Color Whisper in Lust for Blush |
 |
| Swatch of Maybelline Color Whisper in Lust for Blush |

 |
| Maybelline Color Whisper in Lust for Blush: Picture on top was with indoor lighting, Picture on bottom was with outdoor lighting. It's so hard getting an accurate color! |
Here's the complete look:
 |
| Me indoors. |
 |
| Me with the much more flattering outdoor lighting to give you a more accurate color depiction. |
And here's a fat cat in a basket:
 |
| "If it fits, I sits." |
Hope you are all having a wonderful day!
Disclosure: These products were purchased by me for review purposes. I was not paid or compensated in any way. All opinions are my own.
Tuesday, February 12, 2013
Complete Foundation Routine
Hey everyone! I wanted to list out the steps of my everyday foundation routine, which I mostly did, in my last post. That way when I do looks in the future I can skip the foundation part (unless I do something different), and refer you to this page.
As a quick note, I do a concealer and powder foundation routine because I rarely use liquid or cream foundations. I just find that I break out a lot more often when I use foundations I can really feel on the skin. It doesn't mean I won't try any in the future; it just means I haven't found the right stuff yet!
1) I start by prepping my face for make-up. A smooth, clean canvas allows your make-up to apply much more readily, last a lot longer, and just look better in general. I wash my face with the Biore Blemish Fighting Ice Cleanser. Biore's cleanser is great at really deep cleaning the skin, and it hasn't failed me yet! Then I tone my skin with Formula 10.0.6 So Totally Clean Everyday Cleanser Sensitive Formula using a Cotton Round (I like the ones from Target). I love this toner because it's alcohol free; it'll clean and balance the skin without drying it out. Lastly, I moisturize my skin using the Olay Complete All Day Moisture Cream for Sensitive Skin Broad Spectrum SPF 15. I love this stuff to death since I'm so nervous about moisturizers breaking me out; this one is great at giving enough moisture without leaving my skin greasy.
2) This step involves face primer. I don't always use face primer, unless I know I'm going to have a long day, and I want my make-up to last. My current primer is the Smashbox Photo Finish More Than Primer in Dark Spot Correcting. I put this all over my face using my hands, especially concentration on the T zone.
3) After prepping the skin, I use the Maybelline Fit Me Concealer in 15 Fair around my nose. This concealer is great at covering up the redness around my nose without caking up like many concealers tend to.
4) Next it's all about the under eyes. I use the Maybelline Instant Age Rewind Dark Circle Eraser Treatment Concealer in Fair under my eyes. I tap the concealer in with my fingers, then apply Bareminerals Mineral Veil over the top in order to set the concealer with the I on Beauty Powder Brush. I haven't used Mineral Veil for a long time (hence the old packaging) until I discovered just how wonderful it sets under eye concealer. It's the only powder that prevents my under eye concealer from creasing!
5) Now I deal with blemishes and post-acne spots. I cover up any spots with the Maybelline Coverstick Concealer in Light Beige. Now I never hear anyone talk about this concealer but it's hands down the best concealer for blemishes. It's full coverage without clogging my pores or causing breakouts. It's also waterproof, and does not move throughout the day whatsoever. It's best for pinpoint concealing rather than large areas of the face, which is why I do not use it under my eyes (it's just too thick). I prefer to use the ELF Professional Concealer Brush (only $1!) to pinpoint small areas and blend by patting it in with my fingers.
6) Next it's all about the powder foundation. I apply powder foundation to further blend out the concealer and even out my skin tone. I either use the Maybelline Mineral Power Natural Perfecting Powder Foundation SPF 18 in Classic Ivory, Pur 4-in-1 Pressed Mineral Makeup SPF 15 in Porcelain, or Bareminerals Original SPF 15 Foundation in Fairly Light. I apply the powder foundation with one of three brushes: Ecotools Blush Brush (works well all over the face even though it's supposed to be for blush), ELF Studio Powder Blush, or Urban Decay Optical Blurring Brush. With the Ecotools brush, I swirl it into the product and buff into the skin (like they do in the Bareminerals videos). With the ELF brush I take advantage of its flat-topped shape, and I stipple it into my face. With the Urban Decay brush, I use a mixture of buffing and stippling motions; the brush is so dense, it's hard to really mess up. The Urban Decay brush gives the fullest coverage, while the Ecotools brush is the most natural.
7) Now is the time I fix any mistakes I might have made or increase the coverage on any imperfections. To do this I use the Bareminerals Multi-Tasking SPF 20 Concealer in Bisque (for a full review click here). I put this on my under eye area if I still look a bit tired or if my dark circles are particularly bad. I also put a bit of this powder over blemishes that might still look a bit obvious. You know how even if you cover up a blemish, it still looks raised from the skin? Bisque gives blemishes a soft-focus feel, so the blemish doesn't look so uneven. To apply this concealer, I use the Bareminerals Maximum Coverage Concealer Brush. If my skin looks fine, I skip this step all together.
8) Lastly, I set my face with the Urban Decay All Nighter Long-Lasting Makeup Setting Spray. Like primer, this is an optional step that I only do on days when I want my make-up to really last, hot/humid weather, or when I feel like my make-up looks powdery/cakey. This setting spray is great at giving your skin a more natural-looking finish, as well as giving it a bit of waterproofing.
With the finished look I typically look like:
Or when I'm being silly:
 |
| All current possible products used during foundation routine. |
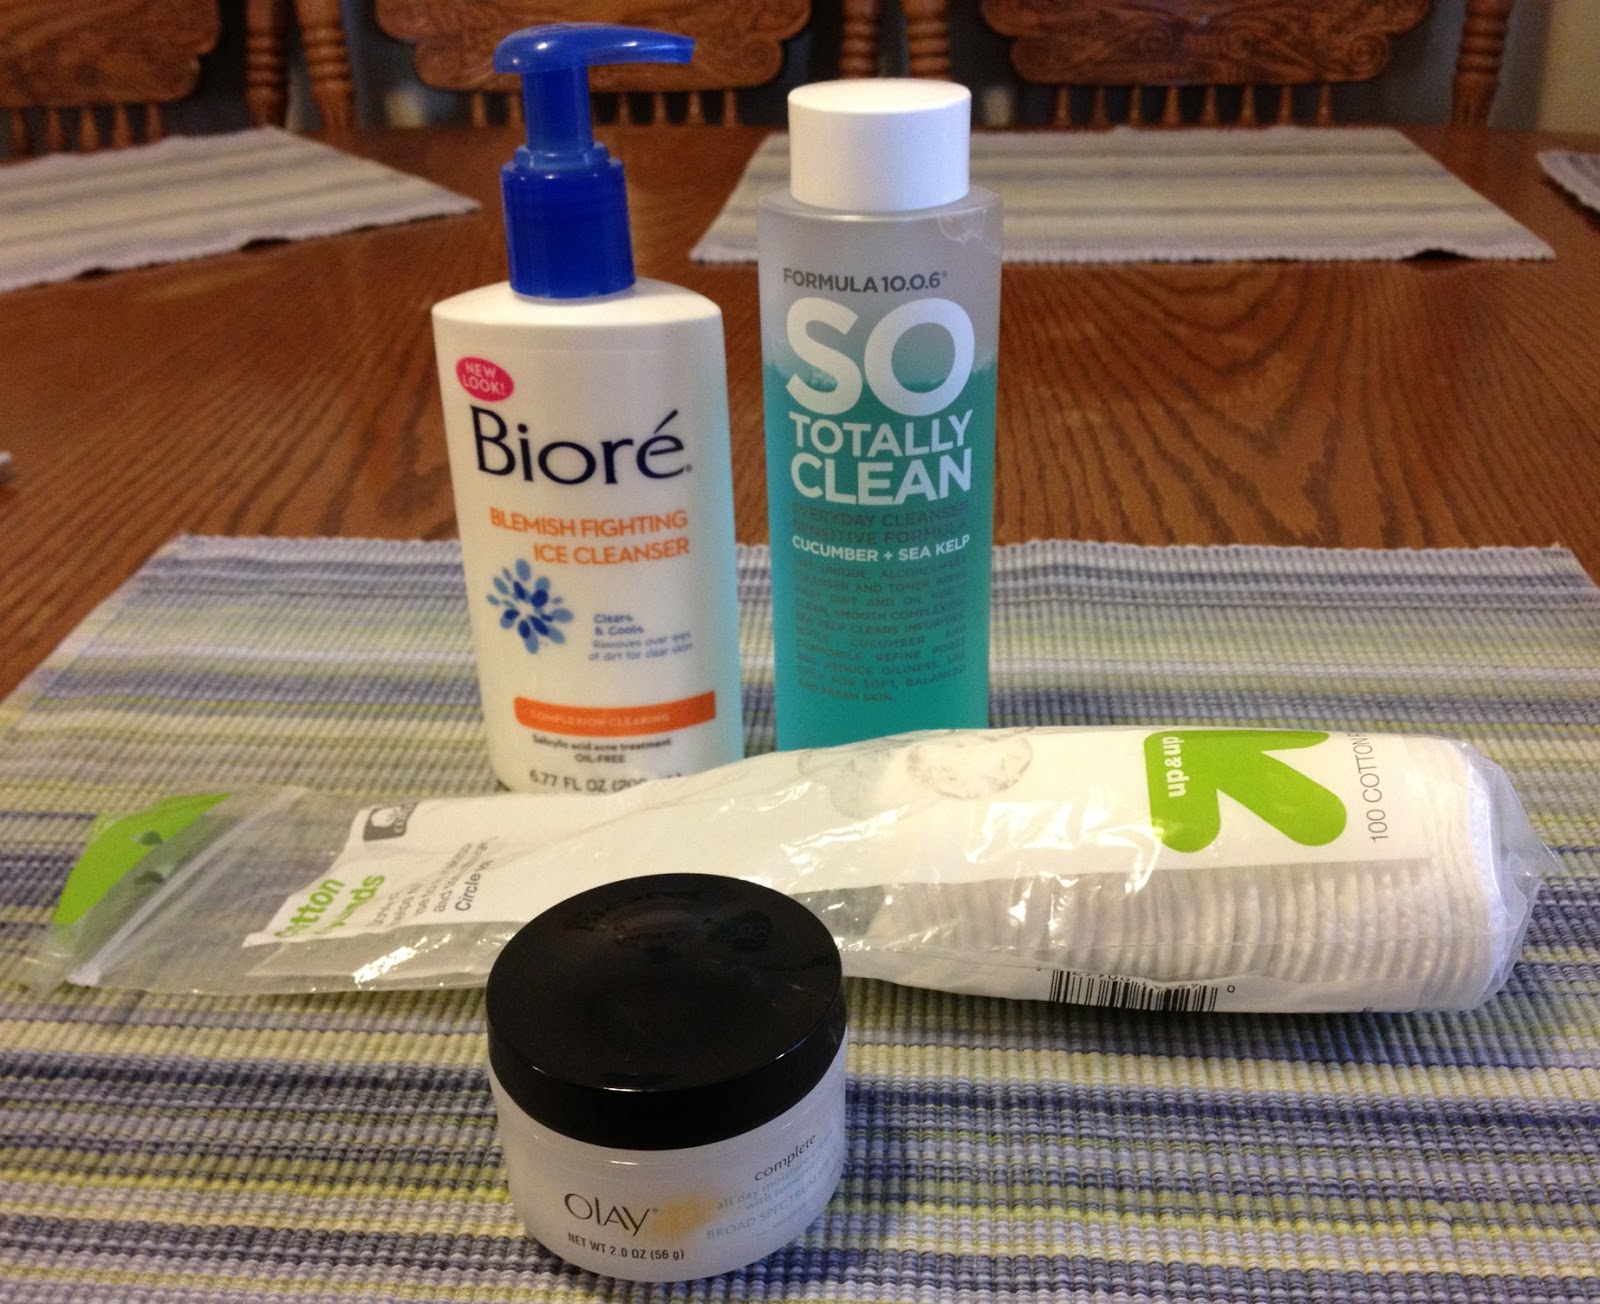 |
| Skin Care Prep: Biore Blemish Fighting Ice Cleanser, Formula 10.0.6 So Totally Clean Everyday Cleanser for Sensitive Skin, Up and Up Cotton Rounds (from Target), Olay Complete Al Day Moisture Cream for Sensitive Skin. |
 |
| Priming: Smashbox Photo Finish More Than Primer in Dark Spot Correcting. |
 |
| Concealing around the nose: Maybelline Fit Me Concealer in 15 Fair. |
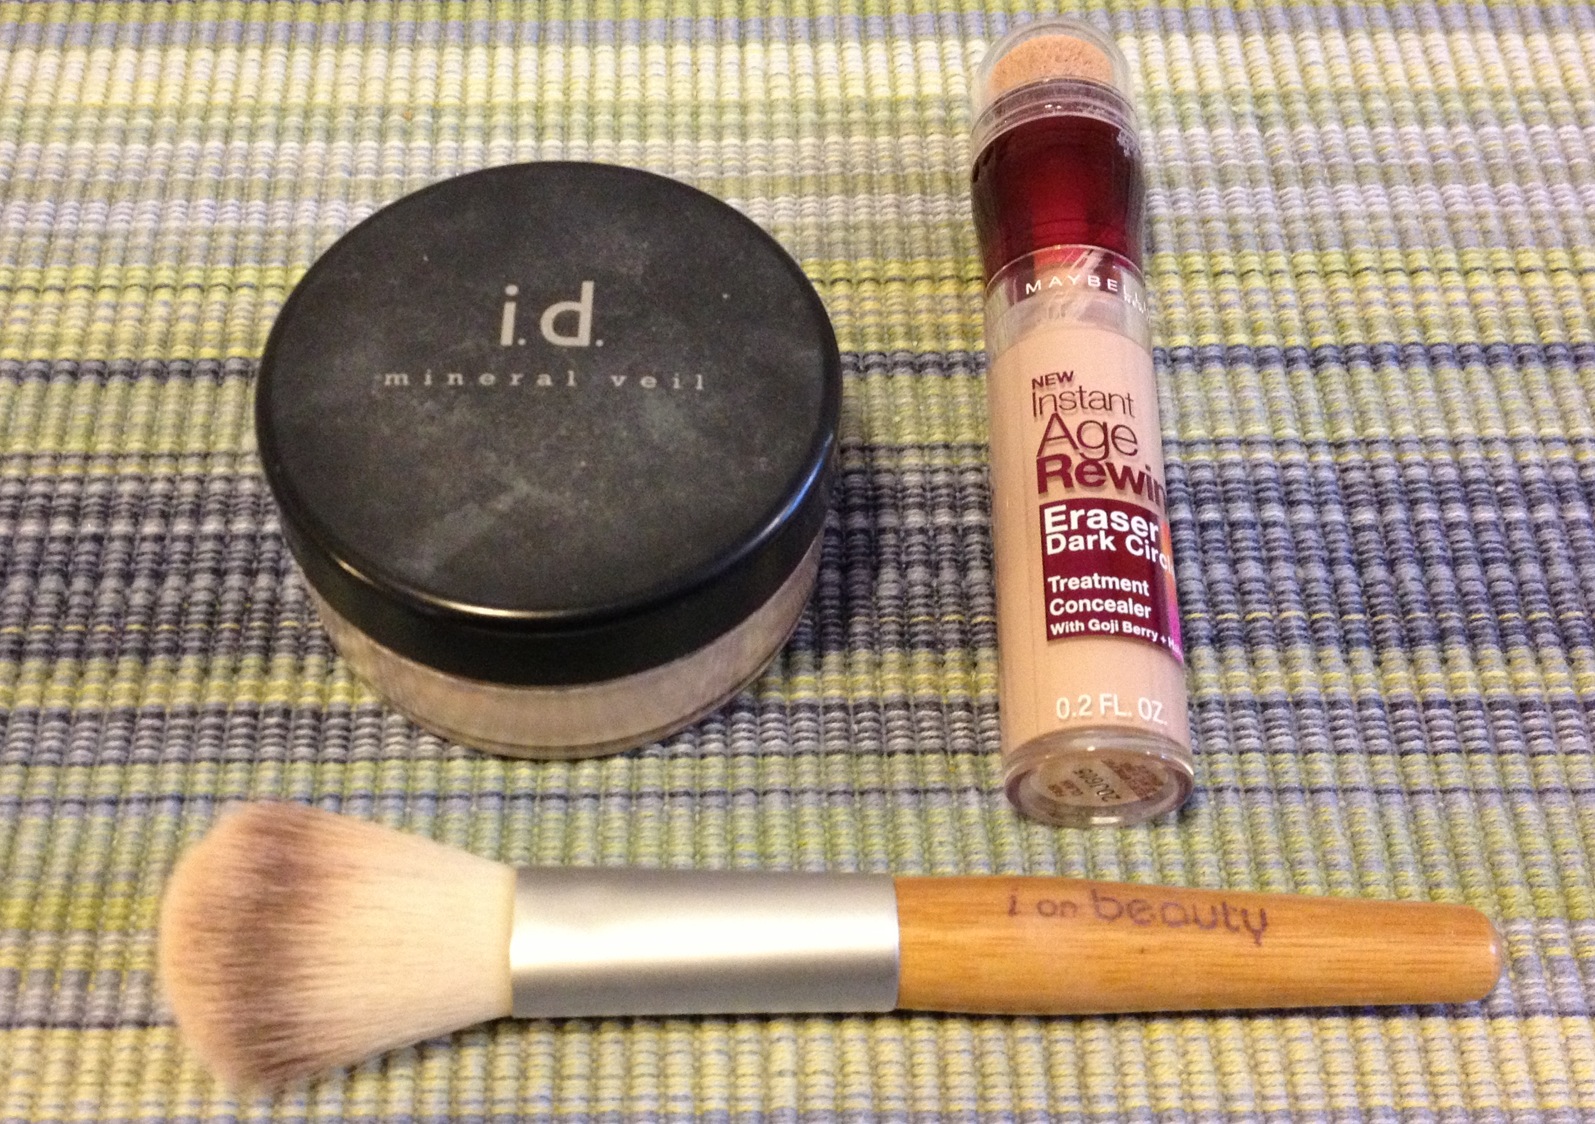 |
| Concealing the under eyes: Bareminerals Mineral Veil, Maybelline Instant Age Rewind Dark Circle Eraser Treatment Concealer in Fair, I on Beauty Powder Brush. |
 |
| Maybelline Instant Age Rewind Dark Circle Eraser Treatment Concealer in Fair |
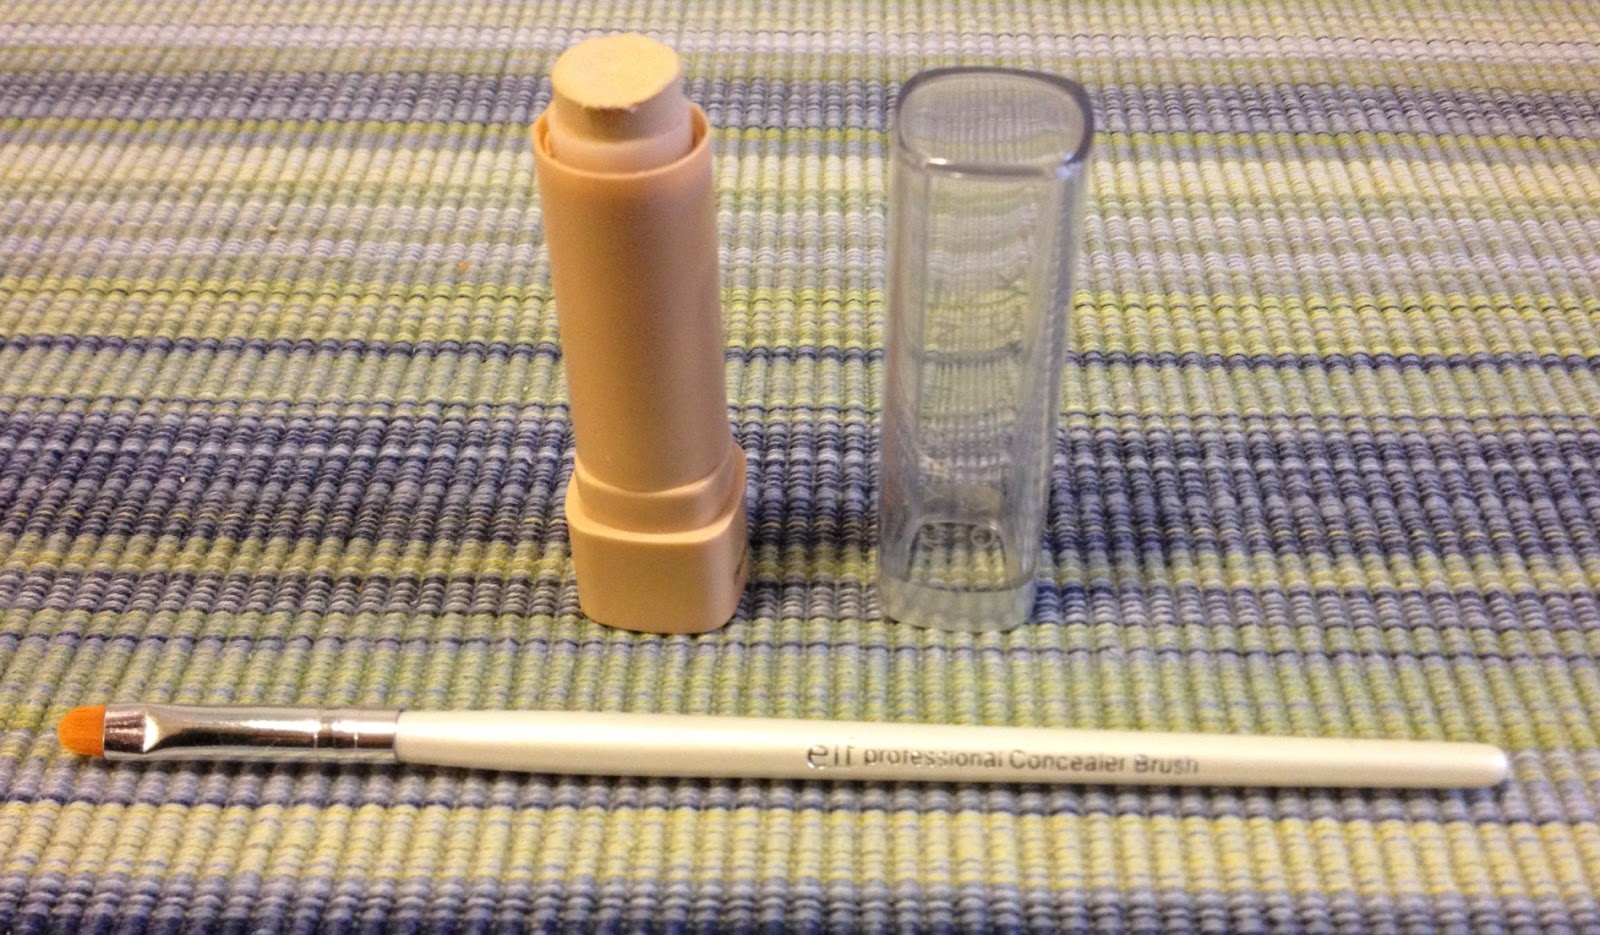 |
| Concealing blemishes: Maybelline Coverstick Concealer in Light Beige, ELF Professional Concealer Brush |
 |
| The Powder Foundations: Maybelline Mineral Power Natural Pefecting Powder Foundation SPF 18 in Classic Ivory, Bareminerals Original SPF 15 Foundation in Fairly Light (in limited edition packaging), Pur 4-in-1 Pressed Mineral Makeup SPF 15 in Porcelain. |
 |
| The powder foundation brushes: Ecotools Blush Brush (lightest coverage), ELF Studio Powder Brush (medium coverage), Urban Decay Optical Blurring Brush (full coverage). |
 |
| The final touches: Bareminerals Multi-Tasking SPF 20 Concealer in Bisque and Bareminerals Maximum Coverage Concealer Brush (it's seen better days, I know). |
 |
| Setting my makeup: Urban Decay All Nighter XL Long-Lasting Makeup Setting Spray-I got this on sale before Urban Decay discontinued this type of packaging. It's still available in the regular size, just with a new design. |
With the finished look I typically look like:
 |
| Me with simple make-up only. |
 |
| Making a face. |
Hope you are all having an amazing Tuesday!
Disclosure: These products were purchased by me for review purposes. I was not paid or compensated in any way. All opinions are my own.
Subscribe to:
Posts (Atom)